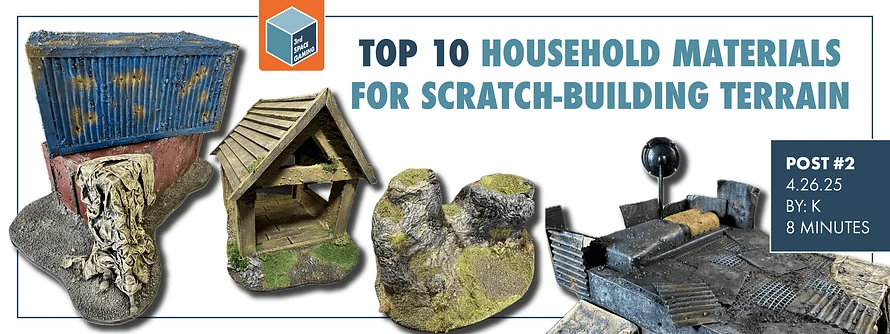
Challenge accepted? Build something incredible using only what you’ve got lying around.
Building terrain from scratch for RPGs and Tabletop games is personally one of my favorite aspects of the hobby. There is something so satisfying about rescuing a broken toy from the garbage and giving it a second life as a bunker, castle, or even space port. Likewise it is fun turning common, everyday household items into something imaginative and fantastical. Not only is it a great way to reduce, reuse, and recycle, but it also is the perfect way to flex your creativity and challenge yourself to think in different ways.
Scratch building terrain is also awesome for newcomers to the hobby, because it is a very low cost way to fill up your gaming table with terrain. It can also be as quick and easy as you want it to be. Sure, you can spend 100’s of hours crafting an elaborate modular game board complete with multi-level castles, but you can also whip together suitable buildings and terrain in just a couple hours. But that’s really the benefit of building your own stuff from scratch, it can be as time intensive or simple as you want.
There’s also a special feeling of pride or attachment you get from making something from scratch. It’s not just a cookie cutter shipping container, it is a shipping container that I made from an old Cheez-it box and some rescued corrugated cardboard. Every piece of terrain ends up having a story of its own even before it is placed on the game board. It is also easy to incorporate storytelling elements into your terrain that makes it uniquely yours: a custom neon sign on a sci-fi bodega, an old tombstone behind a building, or just a gang tag on a shipping container. These are all small elements that can be added to enrich the story and setting even if they aren’t explicitly discussed in game.
With all that being said, let’s dive into the Top 10 materials for scratch built terrain that you most likely already have around the house.
1. CARDBOARD OF ALL KINDS
This is your bread and butter right here. Cardboard is the perfect terrain crafting material for so many reasons. It holds paint well, cuts easily, and is extremely light and sturdy. Plus it comes in so many different kinds, from thin cereal box cardboard to double-walled corrugated, that it can be used to represent any material from metal sheets to shingles to flagstones. Layer it for depth, score it for textures, or shred it up and use it as ground cover. So many possibilities with something that you already have laying around your house.
Pro Tip: Peel off one side of some corrugated cardboard to reveal the ridges underneath. This works well for scrap metal panels that look primo after some dry brushing.
2. POPSICLE STICKS AND COFFEE STIRRERS
Popsicles sticks, coffee stirrers, and tongue depressors are easily my second most used crafting materials. They are flat, sturdy, light, and uniform. Basically just pre-made lumber in a variety of sizes. Clip the rounded edges off with a flat snips and bam, you’ve got yourself some planks to build anything. Think fences, pallets, bridges, ladders, and docks. Glue on top of a cardboard building and you can use the lumber for roofing, siding, and flooring. The natural wood also takes a wide range of glues. It is also easy to distress, weather, and give battle damage.
Pro Tip: A simple brown wash with some lighter dry brushing and you have some believable wood in minutes.
3. CORK AND CORKBOARD
Natural cork has an organic texture that makes it perfect for rocky terrain, cliff faces, or broken ruins. It is easy to cut and chip away at the edges for jagged detail. Wine corks make great stone columns or old tree stumps, while cork board or coasters can be carved into paving stones or broken tiles. Cork is also the perfect mix of lightweight, sturdy, and easy to glue to a wide range of materials.
Pro Tip: Layering flat cork board on hero bases is a great way to give them a little extra height to make them feel imposing and powerful.
4. TOILET PAPER AND NAPKINS
Yes, you read that right. These soft paper products, when combined with PVA glue, basically become paper mache. This is the perfect way to add texture almost anywhere. It can be made to look like stone, bark, stucco, or even cracking plaster. Layer it on thick to build up impressive rock features. Or go for more of a paper, fabric, or tarp feel by slathering it with just enough glue to hold its shape once dry. Plus different paper products come pre-stamped with different patterns, some are good enough to cut out for ready-made rugs. As an extra bonus, toilet paper and paper towel rolls are another top tier crafting material. Towers, tubes, and tunnels have never been so easy.
Pro Tip: Toilet paper and PVA glue can take awhile to dry, so try and make the layers as thin as possible to achieve the desired effect. When making large rock features, layer up lightweight cardboard as the base or skeleton. Then slather the toilet paper and PVA glue on top.
5. WOODEN DOWELS
These make excellent columns, support beams, tree trunks, or even flagpoles and signposts. They are also sturdy enough to be your major supports on larger buildings like towers or bridges. You can often find them in most craft stores, but there are some good alternatives like kitchen skewers and shish kabobs. Old wooden pencils are also an option and work great for smaller tree trunks. Add some texture with a file or wrap them with paper like in #4 to simulate bark.
Pro Tip: The sharp tip of skewers can also be snipped off for easy spikes to line the tops of walls, fences, and barricades.
6. Q-TIPS AND COTTON SWABS
The humble Q-tip is surprisingly versatile. Snip off the ends and you’ve got small rods for pipes or bars. Keep the cotton end intact and fuzz it up for that classic torch look. Like other top 10 materials they are equally light, sturdy, and uniform. Plus they are made from a wide range of materials like paper, wood, and plastic. Cotton swabs are frequently used for extra effect and can represent smoke, fire, and even explosions depending on how you color it. You can also tuck LED lights into cotton balls for that next level ambiance.
Pro Tip: When painting fire and explosions, remember that the hottest part of the fire burns white then blue then it transitions into the classic yellows, oranges, and reds.
7. TOOTHPICKS
Need tiny spikes, posts, railings, or ladders? Toothpicks are your best friend. Not only are they a great crafting material in their own right, but their sharp ends are ideal for piercing foam, cork, and cardboard. Use them as internal supports for modeling clay or other flimsy materials that need some lightweight bones. The sharp ends make them pre-made for wooden palisades, calvary deterrents, or even at the bottom of a spike pit.
Pro Tip: Add some paper fins to one end and you’re ready to start launching a ballista at the bad guys.
8. PACKAGING MATERIALS
Product packaging is a goldmine of unusual shapes, sturdy forms, and versatile textures. Molded pulp trays, packing foam, twisty ties, and even fillers like bubble wrap or craft paper can all find new life on your game table. Molded pulp trays (you know, the things that electronics and appliances are usually boxed in to help protect them) come in many unique shapes and textures. The bumpier pulp textures look great as primitive buildings or worn down ruins. The smoother forms tend to lean more towards a sci-fi aesthetic.
Here’s a short list of other bits to keep an eye out for when unpacking your next purchase:
- Twisty ties: Usually found in most kids toys, they are smooth, long, and easy to work with. Think cables, cords, or vines.
- Craft paper: Recently this has been replacing bubble wrap and other plastic fillers. It can be used as scrolls, tents, or animal hides. Ball it up and use it to fill small garbage bags in your metro apocalypse.
- Plastic bits: There’s usually some plastic handle, bracket, or corner protector that can be reincarnated as scrap metal, electrical components, or even concrete anti-tank obstacles.
Pro Tip: If you play Warhammer, be sure to put those sprues to good use. The plastic is easy to cut and work with. They come in a ton of unique shapes that can be used for power conduits and other electrical equipment. And the straight outer section can be turned into scaffolding with just a couple quick snips.
9. ZIP TIES
From thick to thin, zip ties come in a wide range of lengths, sizes, and colors. They are usually pre-textured on one side in a way that puts them right at home as metal trim. Flip over to the smooth side and with a little texturing you can get more of a natural wood feel. The plastic is also easy to cut, bend, and mold to your will. A simple black primer as a base and then quick dry brushing and it looks like realistic metal.
Pro Tip: The boxy end that locks the tie in place can be snipped off and glued next to modern or sci-fi buildings to act as a security card or eye scanner.
10. KIDS' TOYS
This one probably deserves its own article some day. There are so many different kids toys, but they all usually have the same things in common: they are plastic, they are filled with tiny bits, and they are constantly breaking. So the next time a squirt gun doesn’t squirt, or a Hotwheels loses a wheel, don’t toss it in the trash before thinking about what you can turn it into. Old electronic toys like remote controlled cars are also packed with small springs, gears, and gizmos that sometimes fit the scale and look like the exact kind of thing a bunch of Ork boyz would hoard.
Pro Tip: Yard sales or second hand stores are the best place to scoop up old toys on the cheap. Keep an extra sharp eye out for magnetic tiles as those tend to be pricey new, but are the perfect base to use in modular terrain.
THE REAL MVP: REGULAR OLD WHITE GLUE
Sure, super glue is strong. And hot glue dries fast. But no other glue is as versatile as boring PVA glue (like Elmer’s). It will work well with most of the materials listed above. It can be watered down or mixed with paint to help create a sealant coat. Sprinkle some sand in there to give texture to walls, floors, or rusty metals. It can also be mixed with grass and flocking to create patches of mold or moss. Not only is it extremely versatile, but it is also extremely inexpensive. If you do need to purchase some, always watch for back to school sales and keep in mind that any brand is pretty much the same.
Pro Tip: The one downside to PVA glue is that it contracts as it dries. This means that if you slather a bunch of glue on one side of cardboard it can warp the board. One way to combat this is by spreading a thin layer on the underside as well. This will help to pull the board back into balance and acts as a sealant and protector as an added bonus.
You Can Scratch Together Terrain with Almost Anything
You don’t need to spend hundreds of dollars on premade terrain to get your table ready for game day. What you need is the right creative mindset and the eye for potential in the everyday. From cereal boxes to broken squirt guns, the raw materials for your next great terrain build are probably already in your house.
It is also freeing because these are such low cost materials that it’s ok to experiment freely. Trial and error is encouraged. But most of the time it works out if you trust the process. You’ll be amazed how ordinary junk turns into atmospheric terrain with just a little paint, patience, and creativity. If you are looking for some more inspiration on how to get your board ready for battle, the next article will address some general advice on what terrain to build when first starting out.
And as always, be sure to let us know what your favorite household materials and supplies are for scratch building terrain.
Thanks for reading and happy hobbying!
